For my next project, I will take a break for a week. Instead of starting right away, I thought it will be better to start on March 1st.
During this break I am planning to clean out and organize my basement.....especially my work area. My kids take out all my stuff from the arts & crafts cabinets and don't bother to put it back...I can't find the things I need when I need it.....I am sure most of you moms must be suffering from this too and can understand my plight.
For the next project....I have an idea in my head. Frankly speaking this project really scares me, as I have never done it before...never handled anything remotely familiar. It will be challenging, therefore I have planned to research it well.
Along with research online, I have to make a trip to the local library and see if I can get my hands on some crafting books. I am also planning to go to Michael's today.... I have to checkout and see if they have the necessary supplies. They are the biggest arts & crafts store....I am sure they will have it.
Hopefully all of you join me on March 1st for the big reveal. Take care.
Monday, February 22, 2010
Saturday, February 20, 2010
I did it...Yay!!!
Yep. I met my deadline last night. It was a mad dash.....actually to the finish line...... Yeah I know...Winter Olympics is going on so I am in that spirit. It was not without hiccups though. Yesterday when I was working on the ottoman, I was very cool about the whole thing. I thought it was going to take about an hour at the most. All I had to do was staple the fabric to the wood using the Staple gun. What I did not realize is, the wood was not a piece of thin plywood, but actually 1/2" particle board. The pins from the staple gun just would not penetrate through the board.
 So after careful thought, I decided to use nails. Fortunately for me I had some nails lying around in my husband's toolbox. After hammering my fingers several times I was able to nail all sides of the fabric to the board. I have to say the corners are the most difficult to secure. I was also simultaneously directing my three year old to take pictures of me hammering. I think she did a pretty good job. Oh one more thing...I also had to rush upstairs to the bathroom cause I had accidently superglued my fingers while trying to glue the fabric to the board just wanted to make it nice and neat.

I screwed the ottoman cushion back to its wooden frame and that part was easy.....
 So after careful thought, I decided to use nails. Fortunately for me I had some nails lying around in my husband's toolbox. After hammering my fingers several times I was able to nail all sides of the fabric to the board. I have to say the corners are the most difficult to secure. I was also simultaneously directing my three year old to take pictures of me hammering. I think she did a pretty good job. Oh one more thing...I also had to rush upstairs to the bathroom cause I had accidently superglued my fingers while trying to glue the fabric to the board just wanted to make it nice and neat.
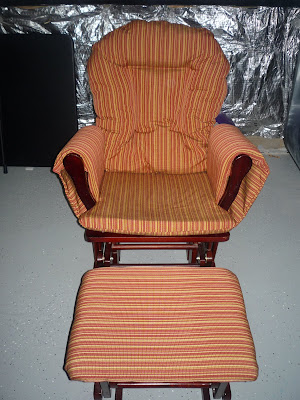
Here it is all nicely finished
I screwed the ottoman cushion back to its wooden frame and that part was easy.....
Wiped RC properly as it had collected quite a bit of dust.....and piece by piece I put it back together....first the arm rests...then the seat cushion and lastly the back cushion.

Looks pretty doesn't it
Now my DH wants it in the living room as he wants to use it while we are watching TV....unfortunately for him we have no room to spare....our couch and loveseat have taken up all the space. Let him figure it out. My work is done.
LESSON LEARNED:
-- Do not wait until the last minute
-- Plan everything ahead of time
-- Make a list of supplies
-- Be very organized
-- Don't superglue your fingers
Thursday, February 18, 2010
Sick, sick, sick
No I don't mean sick of this project....I mean I am really sick. I should not have waited this long to complete it. I could have easily finished RC last week. But, I was overconfident I guess. Since then I have been suffering from one thing or the other. First it was the cold and cough, then the fever and now only the lack of energy. I cannot muster up the energy or the will to do anything. Plus I wish it wasn't so cold.
My deadline is Feb 20th, so I still have two more days to go.....but I wish I had finished it early than wait till the last minute. This is what happens when you procrastinate. LESSON LEARNED.
My deadline is Feb 20th, so I still have two more days to go.....but I wish I had finished it early than wait till the last minute. This is what happens when you procrastinate. LESSON LEARNED.
Friday, February 12, 2010
Update on RC
So far I am done with the following:

I ripped out the old fabric, used it to trace it on the new one. Cut it into shape and sewed along all three sides and stuffed it with the padding. Hand sewed the bottom portion and attached the straps with velcro on them.
Traced the old back cushion on a piece of paper. Cut out the new fabric and sewed all three sides. Stuffed it with batting from the old cushion. The batting was in pretty good shape, so I decided to use it. Voila.....all stuffed and ready. Made straps and hand sewed them to the cushion...


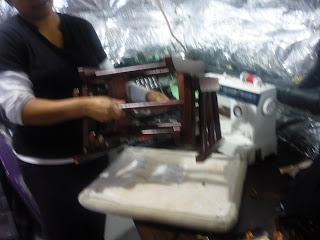 For the ottoman I separated it to get the top portion. I wanted to remove the old fabric as it wall totally messed up. I decide to remove each and every staple pins that are holding them together...
 This is the work in progress. It is very tedious, as I have to take out each an every pin. Hope I don't injure myself in this process.

I ripped out the old fabric, used it to trace it on the new one. Cut it into shape and sewed along all three sides and stuffed it with the padding. Hand sewed the bottom portion and attached the straps with velcro on them.
Traced the old back cushion on a piece of paper. Cut out the new fabric and sewed all three sides. Stuffed it with batting from the old cushion. The batting was in pretty good shape, so I decided to use it. Voila.....all stuffed and ready. Made straps and hand sewed them to the cushion...


Tuesday, February 9, 2010
One Slice Chocolate Cake
Couple of months back I came across a recipe for this One-Slice Chocolate Cake in the Good Housekeeping magazine.I was intrigued and set out to try it. Fortunately I had all the ingredients in my pantry. Well, after it was done and after I had eaten it I was simply in chocolate heaven.
This recipe is perfect for one person or even two of them. So why was I so happy???You see my husband hates anything and everything chocolate and my kids are not big fans of cake either. So if I bake a regular cake or even buy from some store, it usually means I end up eating the whole thing. This recipe is a perfect solution to my problem and my craving ( and no I am not pregnant).
I know it has nothing to do with the project, except that I had a craving for that cake today. So I decided make it and share that recipe here. ENJOY.
Ing:
2 tbsp flour
3 thsp sugar
2 tbsp unsweetened cocoa
1 large egg
2 tbsp milk
2 tbsp vegetable oil
2 tbsp chocolate chips
small splash of vanilla extract
Add all dry ingredients into a mug (or a microwavable bowl) and mix well. Add the egg and mix thoroughly. Pour in the milk and oil and mix well. Add in the chocolate chips and vanilla extract and mix again. Put the mug in the microwave and cook on high for 2 mins. The cake may rise over the top, but don't be alarmed. Allow to cool and tip out onto a plate if desired. Eat or serve it with a dollop of whipped cream.
My thoughts about this recipe: It is a great recipe. It works really well. The texture however is not as soft as you would expect a cake to be....it is more like a brownie.....but what the heck.....I love it.....
Monday, February 8, 2010
Shortcut Queen
Since I started this blog with the intention of finishing a project a month, I have been extremely busy. My kids need me more than ever. There is the never ending cooking and cleaning and the list goes on.
Last week however I was able to work on RC. I am happy to report that I was able to finish the seat cushion and it looks absolutely gorgeous. I did have to make a run to Walmart for some Velcro to sew on the cushion which will eventually be strapped on to the seat of the chair. I really, really wish that I did not have to rush to the store all the time.
Anyway, I was also able to finish the arm rest. They have buttons that are used to attach them to the chair. Since I am not in the mood to run off to the store, I am going to improvise and sew & glue some velcro.There....I am the "Shortcut Queen", always trying to find ways to save time and come up with easier solutions.
Uh..oh..for some reason I am not able to upload the pictures of the seat cushion and arm rest. I try to upload it tomorrow...
Subscribe to:
Posts (Atom)